Outdoor steel does not fail all at once. Rust often begins at a scratched edge, a cut end, or a bolt where water lingers. Salt, humidity, industrial pollution, and repeated wetting can accelerate the damage. The practical question is not only which coating to choose, but how to prepare, apply, and maintain it. How to protect steel products outdoors depends on the environment, the steel’s condition, and the demands placed on the finished product.
The scale of the issue is significant. NACE International’s 2016 IMPACT study estimated the global cost of corrosion at US$2.5 trillion annually, about 3.4% of global GDP. The study also estimated that better corrosion management could save 15–35% of those costs. These figures cover corrosion broadly; they are not specific to outdoor steel. Still, they show why prevention deserves careful planning. ISO 12944, the international standard for protective paint systems on steel structures, provides guidance on atmospheric corrosivity and coating durability. Standards help. Site conditions still matter. A coating that performs well inland may not suit a coastal yard, where salt spray reaches seams and fasteners. In this guide, we’ll examine surface preparation, protective systems, drainage, and inspection. No coating lasts forever. Even a sound system can fail early if rust, oil, or loose scale remains beneath it. That detail is easy to overlook—and worth checking twice.
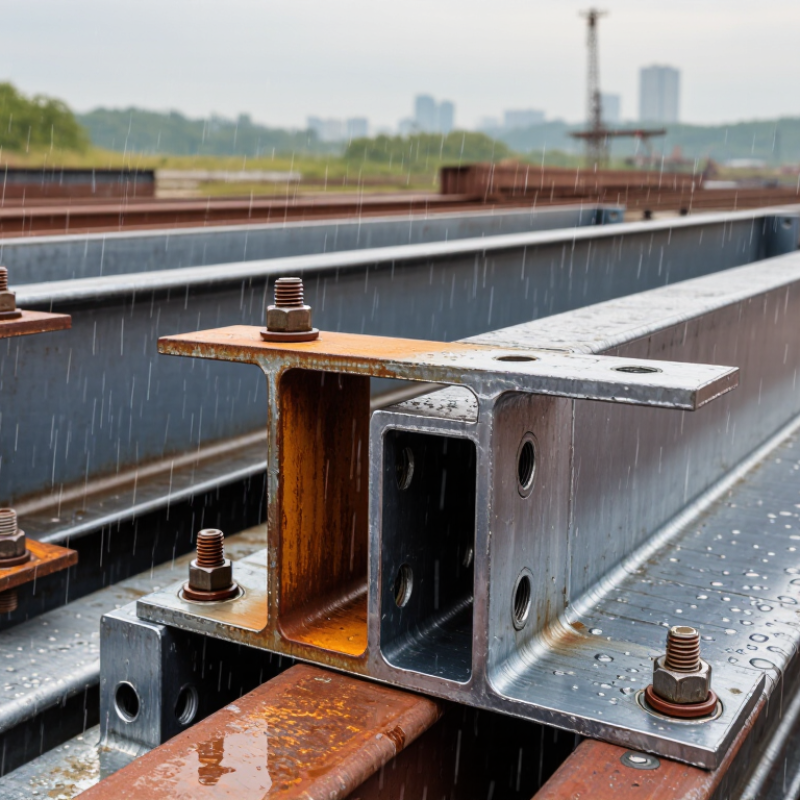
Outdoor steel corrosion depends on more than rainfall. Salt carried inland by wind can settle on a beam, then draw moisture from humid air. Industrial pollutants, condensation, and long wet periods also accelerate attack. A covered loading bay may therefore be harsher than an open site if water collects around joints. Small details matter.
Assess the actual exposure before choosing protection. Record distance from the coast, prevailing wind, humidity, time of wetness, and contact with soil or chemicals. ISO 9223:2012 classifies atmospheric corrosivity using first-year corrosion rates; for carbon steel, category C3 corresponds to 25–50 micrometres per year, while C5 reaches 80–200. These ranges help compare environments, but they do not predict every sheltered crevice or damaged edge. A site survey and, where practical, corrosion coupons provide better local evidence. A map can mislead.
The financial scale is substantial. NACE’s IMPACT study estimated global corrosion costs at US$2.5 trillion, equal to 3.4% of global GDP. That figure covers many sectors, not outdoor steel alone, but it shows why exposure assessment matters. Check drainage, coating damage, sharp edges, and places where dust or salt remains after rain. Then match the protection system and inspection interval to the site’s measured severity. Even careful assessments need revisiting as operations or surroundings change.
Durable outdoor protection starts before the coating can is opened. Dirt, oil, mill scale, and loose rust can prevent a coating from bonding evenly. Wash away grime with a suitable cleaner, then rinse thoroughly so detergent and soluble salts do not remain. Let it dry. Check corners, welds, bolt holes, and the undersides of ledges; these spots hold moisture and often receive too little coating. Remove loose rust and scale using a preparation method suited to the steel and coating. Avoid polishing the surface smooth. The coating’s technical data sheet should guide the required cleanliness and surface profile.
Surface profile matters because many protective coatings need a clean, slightly textured surface to grip. Too little profile can weaken adhesion; excessive roughness may leave peaks with thin coverage. Match preparation to the coating instructions rather than assuming one method suits every steel part. Check steel temperature and weather before application: condensation can form even when metal looks dry. A clean, dry cloth can reveal residual dust or moisture, though it cannot replace product-specific checks. Don’t rush the primer. If dust returns or flash rust appears, clean and prepare the surface again. It can feel repetitive, but missed edges and trapped salts can become weak points outdoors.
Selecting a protective coating starts with the exposure, not the paint label. Salt spray, industrial pollutants, ultraviolet light, and trapped moisture attack steel differently. ISO 12944-2:2017 classifies atmospheric corrosivity from C1 to C5 and CX. Use the site category, expected service life, and maintenance access to guide the specification. On coastal steel, a zinc-rich primer, epoxy intermediate coat, and weather-resistant topcoat may be appropriate. But that system is not automatically right for every structure.
Preparation matters. Remove loose rust, clean the surface, and check edges, welds, and bolt heads, where thin coverage can invite early failure. Small details count. The NACE International 2016 IMPACT study estimated corrosion costs at US$2.5 trillion annually, or about 3.4% of global GDP. It also estimated that corrosion-control practices could save 15–35% of those costs; this is a broad estimate, not a coating-specific guarantee. Specify surface preparation, dry-film thickness, and inspection points, then verify the complete system on the actual steel. No coating is maintenance-free; that claim deserves skepticism. A good plan also allows inspection and timely touch-ups, even when access is awkward.
| Protection system | Typical coating build | Typical thickness | Best suited to | Key benefits | Important considerations |
|---|---|---|---|---|---|
| Hot-dip galvanizing | Steel is immersed in molten zinc, forming a metallurgically bonded zinc coating. | Commonly about 45–85 μm minimum, depending on the steel section thickness and applicable standard. | Fabricated components, posts, railings, and structures requiring broad exterior coverage. | Covers exterior surfaces and many edges; zinc also provides sacrificial protection where the coating is locally damaged. | Part design must allow zinc drainage and venting. Appearance can vary, and repairs may be needed where the coating is damaged during handling or fabrication. |
| Zinc-rich primer, epoxy, and polyurethane | Abrasive-blast-cleaned steel; zinc-rich primer; high-build epoxy intermediate coat; aliphatic polyurethane topcoat. | Typically about 230–340 μm total dry-film thickness, subject to the selected product specification. | Exposed structural steel in industrial, urban, and coastal environments when the specified system is matched to the exposure category. | Combines zinc-based corrosion protection, an epoxy barrier, and a UV-resistant finish with good color and gloss retention. | Requires careful surface preparation, specified application conditions, and checks for coating thickness and continuity. |
| Hot-dip galvanizing with a paint topcoat (duplex system) | Hot-dip galvanized steel, prepared using a compatible method, followed by a suitable primer and paint topcoat. | Zinc layer commonly about 45–85 μm, plus paint thickness specified for the exposure and coating system. | Outdoor steel needing both corrosion protection and a colored or decorative finish, including challenging atmospheric exposures. | The paint adds a barrier and UV protection; the zinc layer provides additional protection if the paint is locally damaged. | Paint adhesion depends on correct preparation of the galvanized surface and use of a compatible coating system. |
| High-build epoxy with polyurethane topcoat | Abrasive-blast-cleaned steel; one or more epoxy coats; UV-resistant polyurethane finish. | Often about 200–350 μm total, depending on the number of coats and project specification. | Steel structures where a strong barrier coating, color retention, and a smooth finish are priorities. | Epoxy provides a durable moisture barrier; polyurethane helps resist sunlight-related chalking and fading. | Epoxy exposed directly to sunlight can chalk and lose color. Damaged areas need inspection and timely repair. |
| Single-coat alkyd paint | Prepared steel with a conventional alkyd primer or paint coat, applied at the specified film thickness. | Varies by product; commonly a thinner film than multi-coat protective systems. | Lower-exposure locations, light-duty items, or situations where frequent maintenance is acceptable. | Straightforward to apply and maintain, with a wide range of finish colors. | Generally less suitable for persistent wetness, salt exposure, or aggressive industrial conditions than a properly specified multi-coat system. |
Selection note: These thicknesses are indicative ranges, not guaranteed service-life predictions. Choose a system according to the site exposure, design details, surface preparation, application quality, and maintenance plan. For painted systems, standards such as ISO 12944 can help classify atmospheric corrosivity and guide system selection; galvanizing requirements are commonly specified using ISO 1461.
Applying a protective coating correctly matters as much as choosing one. NACE International’s 2016 IMPACT study estimated corrosion costs at US$2.5 trillion annually, about 3.4% of global GDP. It also found that established corrosion-control practices could save 15–35% of those costs. The figures show why rushed field work can be expensive.
Start with a clean, dry surface and remove oil, loose rust, and dust. Check steel and air temperatures, humidity, and dew point before coating; condensation can undermine adhesion. Mix components in the specified ratio, observe induction time, and apply the stated wet-film thickness. Brush edges, welds, and bolt heads carefully, where thin coverage is easy to miss. Then allow each coat to cure within its specified temperature and recoat window. A surface may feel dry while the film remains soft beneath it. That detail is easy to overlook.
Tips: Keep a wet-film gauge, thermometer, and batch log at the work area. Measure dry-film thickness after curing, following a recognized method such as SSPC-PA 2. Record conditions and touch up defects before exposure. Even careful checks cannot eliminate every site variable; inspect the finished coating again after handling and transport.
Inspect protected steel on a regular schedule, and after storms, installation work, or nearby construction. Look closely at cut edges, welds, joints, bolt heads, and areas where water can collect. These spots often lose coating first, especially when dirt stays damp against the surface. Check for blistering, peeling, fine cracks, white deposits on galvanized surfaces, or orange rust. Use good light. Photograph defects from the same angle each time, and note their location and size. Small changes are easier to judge than memory.
Clean with fresh water and a soft brush when dust, salt, or bird droppings build up. Rinse thoroughly, then let the surface dry before deciding whether damage needs repair. Avoid scraping sound coatings with metal tools; a quick fix can create a larger bare spot. For exposed steel, remove loose corrosion carefully and apply a repair coating compatible with the existing system. Follow preparation and curing instructions, since poor surface preparation often causes early failure. Keep drains open and replace damaged washers or seals that trap moisture against the steel. Coastal spray and road salt call for closer attention than a sheltered yard. Even a tidy checklist cannot catch everything.
Salt, humidity, pollutants, and long wet periods can speed corrosion. Wind may carry salt inland. Small joints matter.
Yes. Water trapped around joints can keep steel wet. A roof does not guarantee protection.
Record coastal distance, prevailing wind, humidity, wetness duration, and contact with soil or chemicals. Inspect drainage and sheltered crevices.
They compare typical first-year corrosion rates. For carbon steel, C3 is about 25–50 micrometres yearly; C5 is about 80–200. Local conditions may differ.
Remove dirt, oil, loose rust, and scale. Rinse away cleaner and salts, then let the steel dry. Check welds and bolt holes.
Coatings need a suitable profile for adhesion. A surface that is too smooth may weaken the bond; sharp peaks may receive thin coverage. One method will not fit every job.
Check steel and air temperatures, humidity, and dew point. Mix components as directed, apply the specified thickness, and allow each coat to cure. Dry to touch is not fully cured.
Use a wet-film gauge during application and measure dry-film thickness after curing. Keep a thermometer and batch log nearby. Recheck after handling; a checklist can still miss a damaged edge.
Match them to measured site severity, then revisit them when operations or surroundings change. Look for coating damage, trapped salt, and poor drainage. A map can mislead.
How to protect steel products outdoors begins with understanding the conditions they will face. Moisture, salt, pollution, temperature changes, and physical wear can all increase corrosion risk, so assess the exposure level and the steel’s intended use before choosing a protection system. Thorough surface preparation is essential: remove rust, dirt, oil, and loose material, then ensure the steel is clean and dry so the protective coating can adhere properly.
Select a coating suited to the environment and apply it evenly according to its specified coverage and curing requirements. Pay particular attention to edges, joints, fasteners, and other areas where protection may be difficult to maintain. After application, allow the coating to cure fully before exposing the steel to harsh conditions. Regular inspections can identify scratches, peeling, or early corrosion, allowing timely cleaning and touch-ups. Consistent maintenance helps preserve the coating and extend the service life of outdoor steel products.

Campfire Steel